POSTS
Build a minimalist fullstack CRM app in 5 minutes with aurelia and loopback
Introduction
Obviously, CRM apps aren’t built in 5 minutes. Luckily, the idea of this article is not to show you how to build a CRM application and our sample really hasn’t anything at all to do with a Crm app.
What I want to show in this article, is that setting up everyting you need for building a full stack application ready to be enriched with any line of business scenario can be effectively done in 5 minutes.
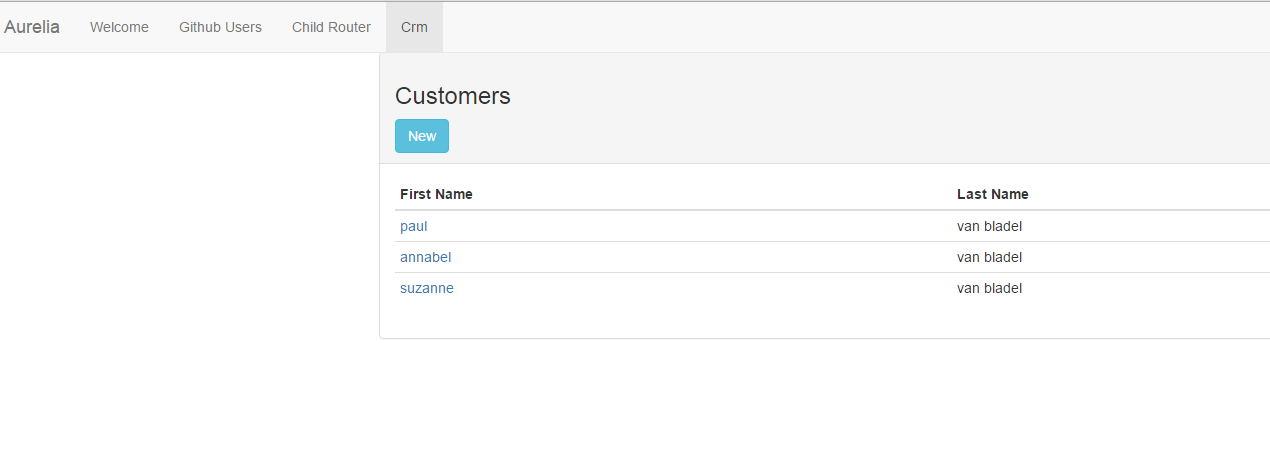
Nonetheless, here is a screen shot of our monty python full stack CRM app:
Which development tools do I need?
I’m working on windows. All you need is a command prompt. Preferably a tool like Cmder and a good text editor. I’m using sublime text. You also need to NodeJs and Npm installed.
Which technology are we envisioning?
We want a full stack approach with one both sides of the wire javascript in such a way eventually (not in this article) we will add isomorphic goodness. Client side we will use Aurelia, the most promising single page application framework around. Server side we will use Loopback, one of the best ExpressJs based solution for REST Apis. We want to build this full stack application based on Yeoman, the best scafolding tool in the world. This allows us to setup a base structure without too much file shuffling and furthermore the Yeoman tooling can further help us in extending the application with more business scenarios. There are Yeoman generators for both Aurelia and Loopback, but currently there is no integrated Yeoman approach. At least, not yet !
Where are the sources?
In case you don’t want to follow the next steps, you can directly download the sources of the app on github.com/paulvanbladel/aurelia-loopback-sample and following the instructions in the readme file for kicking off the app.
How will we proceed?
Well, basically the whole process boils down to following steps.
- create the server side project (the Loopback NodeJs express app) with yeoman
- create the client side Aurelia SPA project (in a seperate folder apart from the server project)
- copy the aurelia app in the client folder of the server project
- do a small tweak on the Gulp webserver processing
- add a model (in our case a customer model) in the loopback app
- add a corresponding basic crud scenario in the aurelia app
- start the server and gulp watch the client and enjoy.
Step 1 : create the loopback server app with Yeoman
Make sure you installed correctly the loopback tool. Following the instruction on the StrongLoop web site. Baiscally, this boils down to :
npm install -g strongloop
No need to install MongoDb, we will use an in memory database instead (with persistence in a simple text file). Obviously, for production purposes, you will want to use a decent database like MongoDb. Run now the Yeoman scaffolding tool for generating the app:
yo loopback
Simply follow the instructions, take whatever name for the app.
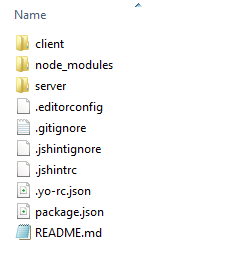
At the end, you will get following file structure:
As a first smoke test, you can start the app:
node server/server.js
You can even browse to the explorer middleware and do already some CRUD operations with the built-in User model. Consult the Strongloop documentation for more details. Anyhow, you will need these for fine-tuning your Rest Api and the server side business logic.
Step 2: create the Aurelia SPA.
This is the only part where you need to be careful. We will use here again yeoman for setting up the SPA’s base structure, but it’s important that we do this in a folder completely separate from the previous step. In the end, we will move the aurelia spa in the client folder of the loopback app, but we can not generate the application in this folder. This has to do with Yeoman trying to be smart. When, one day, an integrated Yeoman-loopback generator is available, this problem will be solved. So, e.g. create the aurelia spa in c:\temp\my-aurelia-app by running:
yo aurelia
I presume here that you are familiar with aurelia, so test the app by running
gulp watch
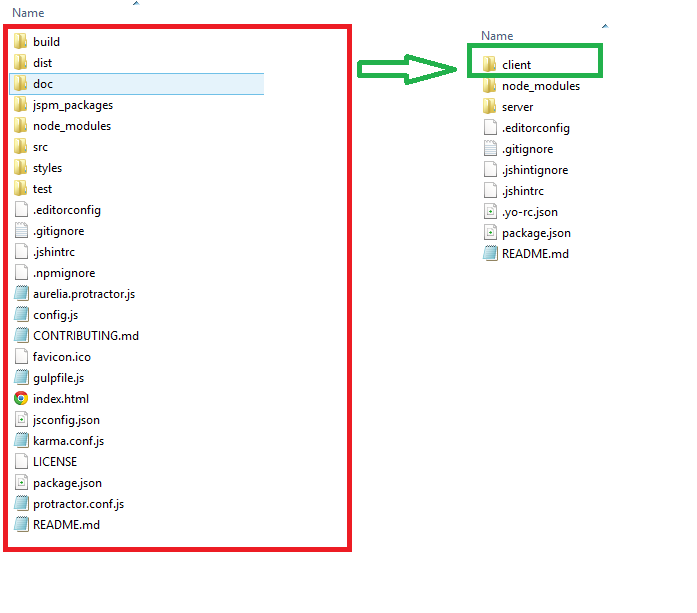
Step 3: merge client with server
The loopback app contains a folder client. That’s the place where we need to copy the full sources of the aurelia app created in step 2.
If you still didn’t get it:
Windows users might run into the problem that copying paths contains node_modules with very longs paths gives trouble. My solution is to use Seven-Zip for copying, moving or deleting folders running into that problem.
Now, although we merged files from client into server, there is still a perfect separation, the only design time integration we make is in the next step, were we slightly tweak the client side gulp processing specifically for the nodeJs server.
All jspm and npm specific material related to the client is directly in the client folder !
If tomorrow you want to move this application to a .Net based backend, just copy the full client folder and move it to visual studio. It will work without any problem. Similarly, if you want to replace the Aurelia spa with another spa, drop it in the client folder and it will work, but probably not as good as aurelia though :)
Step 4: tweak the gulp web server processing.
Basically, we have now a server application and a bunch of static files (the aurelia app). One option could be to let nodeJs (so the server app) serve these static files. That’s an approach I do not like. NodeJs is an application framework, not a file server. Serving files is the task of a web server, which will do this much faster. So, the tweak in the gulp processing that we are envisioning here is to make sure that web server is serving all static files, but request to https://localost/4000/Api/xyz are proxied to the NodeJs application.
var gulp = require('gulp');
var browserSync = require('browser-sync');
var proxy = require('proxy-middleware');
var url = require('url');
var paths = require('../paths');
gulp.task('serve', ['build' ], function(done) {

  var proxyOptionsAccessControl = function(req,res, next){
        res.setHeader('Access-Control-Allow-Origin', '*');
        next();
  };
  var proxyOptionsApiRoute = url.parse('http://localhost:' + paths.nodeJsPort +  '/api') ;
  proxyOptionsApiRoute.route = '/api';

  var proxyOptionsAuthRoute = url.parse('http://localhost:' + paths.nodeJsPort +  '/auth') ;
  proxyOptionsAuthRoute.route = '/auth';

  browserSync({
    open: false,
    port: paths.webServerPort,
    server: {
      baseDir: ['.'],
      middleware: [
        proxyOptionsAccessControl,
        proxy(proxyOptionsApiRoute),
        proxy(proxyOptionsAuthRoute)]
    }
  }, done);
});
You might notice that we need another npm module for the proxy middleware, so install it from the client folder as development dependency:
npm install --save-dev proxy-middleware
Update also the path.js will following variables:
nodeJsPort:3000,
webServerPort : 4000
step 5: add the customer model in the loopback server app
This is done again with the yeoman tooling from the server folder:
yo loopback:model
Again some steps to follow and some questions to answer (consult the loopback documentation for more details). Make sure to create a model called customer with the fields firstName and lastName (case sensitive). When asked for a plural name for customer, make sure to type customers. Let’s directly do a small tweak so that our in memory data are stored in a file: Locate in the server project the file dataSource.json and adjust as follows:
{
  "db": {
    "name": "db",
    "connector": "memory",
    "file":"mydata.json"
  }
}
All data will now be saved in the file mydata.json.
Step 6: add a basic crud scenario in the aurelia SPA.
The easiest way to proceed is to copy some file from github into your client project.
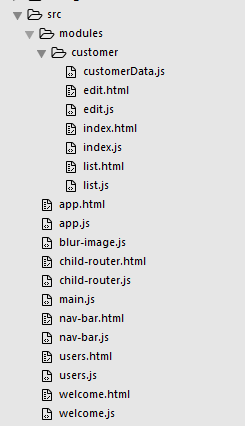
I have stored all artefacts for the customer scenario in a folder customer in a modules parent folder:
 Copy these over from github.
We also need to add the customer router in the app.js:
import 'bootstrap';
import 'bootstrap/css/bootstrap.css!';

export class App {
  configureRouter(config, router){
    config.title = 'Aurelia';
    config.map([
      { route: ['','welcome'], name: 'welcome',      moduleId: './welcome',      nav: true, title:'Welcome' },
      { route: 'users',       name: 'users',       moduleId: './users',       nav: true, title:'Github Users' },
      { route: 'child-router', name: 'child-router', moduleId: './child-router', nav: true, title:'Child Router' },
      { route: 'customer', name: 'customer', moduleId: './modules/customer/index', nav: true, title:'Crm' }

    ]);

    this.router = router;
  }
}
Note also I’m still using aurelia-http-client, so install that as well from the client folder
jspm install aurelia-http-client
How to run the sample?
You need to open two command prompts (you will appreciate here the tabs in the Cmder tool): One in the client folder and one in the server folder. In the server folder type:
node server.js
This should give following output:
λ node server.js
Browse your REST API at http://localhost:3000/explorer
Web server listening at: http://localhost:3000/
In the client folder type:
gulp watch
Normally, it should be possible to use a gulp tool like NodeMon for automatically starting the server side nodeJs process and restarting it when there a file changes. A bug in NodeMon specific to the above folder structure, prevents me from demonstrating this here. Anyhow, you will need a command prompt in the server project when you want to run the yeoman scaffolding for generating other models, etc. … ##What’s next. Quite obvious: build our own aurelia-loopback generator :) ##Conclusion This was an unusual long post given the fact that every step has been explained in detail. Nonetheless, when you understand the above, you can do it on your own in 5 minutes, as advertised ! Enjoy !